Wednesday, April 29, 2015

The Cost of doing Business... erm, Carelessness

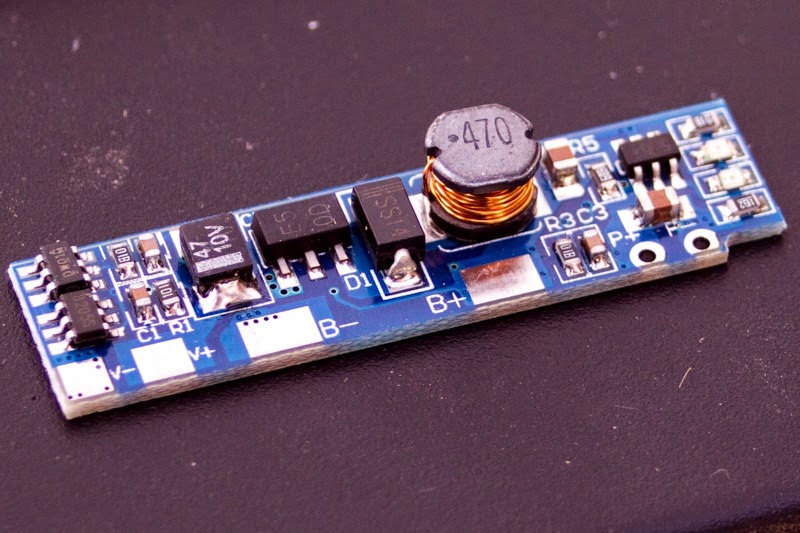
After testing different ways of interfacing a uC with the Li-Ion charge control circuit, I accidentally put the over/discharge protection circuit out of commission when I connected the B- and the V- GND nets. Best I can tell is that the GTT8205S MOSFET got damaged and is no longer reliably connecting the battery to the rest of the circuit. Oh well. I already ordered a replacement.

Here's a circuit diagram for a test-version of the Energy Brain. I use an optocoupler to control the charging of the super-capacitor so that in later versions of the device an external uC on a separate power net can trigger a recharge of the capacitor.


Until a replacement for the fallen soldier arrives, I'll dink around with some other things. I've been reading up on artificial-neural-networks (ANNs) and that has been giving me some ideas, to say the least.

Saturday, April 25, 2015

Tools of the Trade

I use an old Arduino Duemilanove as my In-System-Programmer to flash bootloaders and software onto ATtiny and ATmega uCs.  There are a number of decent guides out there on how to do that:


The greatest source of frustration and errors for me has been flimsy breadboard setups, especially if I'm repeatedly programming different chips during a project.

I've since built a couple of custom mini-shields to make the process as painless as possible.

Meet the Freeloader and the Privateer:


The two mini-shields allow me to switch between different size capacitors for the RESET and 5V pin on the Duemilanove. I've found that the required capacitance for error-free flashing changes depending on the frequency and type of oscillator I am fusing the chip for.

A Brain in a Brain

The circuit discussed in my last two posts already has some intelligence of its own. The TP4057 charge control IC switches between constant current and voltage mode as the lithium cell increases in charge, and the DW01AM over- and discharge protection IC disconnects the battery's negative terminal from the rest of the circuit in the event that its voltage drops below 2V, or if the charge voltage rises over 4.3V.

As part of the Energy Brain I want the ATtiny uC to monitor the Li-Ion cell and the super-capacitor voltage. When either drops below a certain level, the ATtiny communicates on an interrupt line with the uC in the Memory & Learning Brain and lets it know what's up. The Memory & Learning Brain can then decide what to do with that information; to initiate a recharge of the super-capacitor, to communicate a request for solar charge to the outside world, to alter sensing and communication behavior in ways that conserve energy, or to send other Brains into sleep mode.

What I'm trying to mimic here is the connection between the biological gut and brain; the involuntary sensation of hunger or exhaustion, and the intentional decision to eat, sleep, or forage for food.


HP-0014B PRO Charge Controller Circuit Diagram

I spent some time mapping the Li-Ion charging circuit I purchased. As far as I can tell the circuit is a combination of the reference design for each of the integrated circuits - U2, U3, and U4 - and an RC filter. My guess is that the RC filter is supposed to keep the noise from the DC/DC converter from interfering with the current monitoring of the lithium cell charging IC.

The next step is to evaluate the best way to interface an ATtiny85 to monitor and control the circuit.

HP-0014B PRO Charge Controller Circuit Diagram


HP-0014B PRO Charge Controller Circuit Board


Datasheets:

Wednesday, April 22, 2015

Hardware for the Energy Brain

Most of these components were left over from other projects:


My experience building charge controllers and switching power supplies is limited. To save time I ordered this little circuit from browndoggadgets.com:


This 3.7V Li-Ion charge control circuit accepts 5V Vin and has an integrated 5V boost supply that feeds off the battery. My hope is to modify the circuit board so that the ATtiny85 uC can turn the 5V boost supply on and off as needed.

Tuesday, April 21, 2015

Tamaduino: Energy and Stamina

This might seem a little unconventional, but rather than having the Tamaduino's hardware hooked up to a steady power supply, I want to introduce the concept of stamina. I'm thinking of achieving that by using a 1F super-capacitor as primary power source. The capacitor will deplete much more quickly than a battery, but slow enough to allow the Tamaduino to do stuff. 


Depending on the amount of charge stored in the capacitor, the Tamaduino's interactive abilities would change. When the charge drops below a certain level, the Tamaduino will have to rest while the Energy Brain activates a boost circuit and recharges the super-capacitor from a Li-Ion battery. If the charge in the Li-Ion battery drops below a certain level, the Tamaduino will start making an effort to motivate forces in the environment to move the Tamaduino to a location where its solar panel can recharge the Li-Ion battery. Simultaneously it would start changing its overall behavior to conserve as much energy as possible until it has eaten a sufficient amount of photons.

In some way I'm trying to mimic a biological energy metabolism. Humans ingest food and store the energy in different mediums. Some of them are accessible super quickly, like ATP, some of them require metabolizing, but are fast acting, like sugar, and some mediums, like fat, are very energy dense but take much more time and effort to be converted into biologically available energy. 

In the Tamaduino's energy metabolism, sunlight would be the food; the Li-Ion battery would be the fat; the super-capacitor would be the glucose; and the distributed electrolyte- and ceramic capacitors would be like ATP. The comparison might be a little off, but I hope my biology metaphors make sense.

Provisional Block Diagram

In my block diagram I'm using the metaphor of different "brains" to identify different subsystems of the Tamaduino. The human brain has parts that are older and more basic, like the brain stem and the cerebellum, and parts that are more recent and complex, such as the frontal lobes. 

Looking at my diagram here, I'd have to say that the "Energy Brain" is the place to start this project. The biological analog of the Energy Brain would be the brain stem. It is responsible for the basic metabolic processes of the host. I'll be publishing a rough draft of the Tamaduino's energy system sometime soon. It's gonna be weird.


Outline of the Tamaduino Project

As the portmanteau suggests, I'm setting out to create a Tamagotchi inspired, Arduino powered device. I'm going to lay out what I have in mind so far to help me conclude the next steps more clearly.

Features:
  • senses sound, light, temperature, vibration/movement, being handled
  • responds to environment with light, sound, vibration, other actuators
  • rechargeable battery and a solar panel
  • AI like software that interacts with its environment to optimize care-taking 

Design Goals:
  • create a device with a survival instinct
  • abstract bio-mimicry throughout the device
  • bottom-up design approach
  • AI being shaped by and engaging in operand conditioning

Frankly, I have no idea what I'm doing and I'm in way over my head. But since I don't care, here's my preliminary TODO list to help guide me through the next few steps:
  1. Create provisional block diagram
  2. Draft a preliminary design for the most fundamental block
  3. Source the necessary hardware
  4. Build, test, improve the block
  5. Modify provisional block diagram
  6. Draft preliminary design for the next most fundamental block
  7. Repeat steps 3 to 6 until project complete

¯\_(ツ)_/¯